

Writing the OS and the first headless boot
Goal
You will write Raspberry Pi OS to a microSD card with a ready-made configuration (user, Wi-Fi, SSH with a key), find the Pi on the network, log in with ssh and update the system. Optionally, you will start the serial console.
Parts you need
- Raspberry Pi, power supply, microSD card, card reader
- a Wi-Fi network (or an Ethernet cable)
- optionally: a 3.3 V USB-UART adapter and 3 female-to-female jumper wires
Step 1. Writing the card in Imager (2.x)
These steps follow the official instructions:
-
Device: choose your model (Raspberry Pi 4 or 5).
-
OS: Raspberry Pi OS (64-bit) (with desktop) or Raspberry Pi OS Lite (64-bit). For headless work I recommend Lite. The "Legacy" versions are the old Bookworm, so don't pick them without a reason.
-
Storage: choose the card. ⚠️ Leave "Exclude system drives" ticked so you don't overwrite your computer's disk. If you aren't sure which one is the card, unplug other USB storage devices.
-
Customisation (recommended). The sub-tabs in turn:
- Hostname: for example
wirelab-pi(letters, digits and hyphens only). The Pi announces this name over mDNS, so you can reach it aswirelab-pi.local. - Localisation: your capital city (for example London). This sets the time zone, the keyboard layout and the Wi-Fi country.
- User: a username (lowercase letters, digits,
_,-) and a password. You will also need this password forsudo. - Wi-Fi: SSID and password. For headless work this is crucial, because the Pi has to connect straight after booting.
- Remote Access: turn on Enable SSH and choose Use public key authentication. Paste the contents of
~/.ssh/id_ed25519.pubor point to the file with the Browse button. Imager only pre-fills a key from~/.ssh/id_rsa.pub, so paste or browse to your Ed25519 key yourself. - Raspberry Pi Connect: optional, not needed in this course.
- Hostname: for example
-
Save and wait for the write and verification to finish.
Step 2. First boot and finding the Pi on the network
Put the card in the Pi and connect the power. The first boot takes longer than later ones, because the system expands the partition and applies your settings. Give it 2–3 minutes.
Method 1: mDNS (.local)
# (on Fedora)
$ ping wirelab-pi.local
$ avahi-resolve -n wirelab-pi.local     # from the avahi-tools package
$ avahi-browse -art | grep -i ssh       # list of services on the network
Raspberry Pi OS has mDNS (the Avahi service) enabled by default. If you didn't set a hostname, the default name is raspberrypi.
Method 2: nmap (subnet scan)
# (on Fedora) – first check your own address, e.g. 192.168.1.23
$ hostname -I
$ sudo nmap -sn 192.168.1.0/24
With sudo, nmap usually also shows the network card's manufacturer, which makes it easier to spot the Raspberry Pi.
Method 3: the list of devices in your router's admin page.
Step 3. First login over SSH
# (on Fedora)
$ ssh adrian@wirelab-pi.local
On the first connection SSH asks about the host key fingerprint. Type yes. If you chose key-based login, you won't need a password (unless you protected the key with a passphrase).
A handy shortcut: add this to ~/.ssh/config on Fedora:
Host pi
    HostName wirelab-pi.local
    User adrian
    IdentityFile ~/.ssh/id_ed25519
From now on ssh pi is enough, and you can copy files with scp file.py pi:~/.
Step 4. Updating the system
The Raspberry Pi documentation recommends full-upgrade rather than a plain upgrade, because Raspberry Pi OS changes package dependencies more often than Debian does:
# (on the Pi)
$ sudo apt update
$ sudo apt full-upgrade
$ sudo reboot
While you're at it, check the system version and the model:
# (on the Pi)
$ cat /etc/os-release | grep PRETTY
$ cat /proc/device-tree/model
$ groups          # should include gpio (and usually i2c)
Step 5 (optional). The UART serial console
The serial console saves the day when the Pi won't connect to the network. You see the boot messages and can log in over a cable.
Enabling it on the Pi. Run sudo raspi-config → 3 Interface Options → I6 Serial Port. When asked about a login shell over serial, answer Yes, then reboot the Pi. On the desktop version, turn on both switches in Preferences → Control Centre → Interfaces: Serial Port and Serial Console.
🟦 Pi 4 / Pi 5: where the console is
- Pi 4: the console is on GPIO14 (TX, pin 8) and GPIO15 (RX, pin 10).
- Pi 5: by default the main UART (UART10,
/dev/ttyAMA10) comes out on the separate 3-pin connector labelled "UART", not on the 40-pin header. You need a suitable cable for this connector (for example the Raspberry Pi Debug Probe). According to the documentation, when nothing is connected to the debug connector andconfig.txtcontainsenable_uart=1, the Pi 5 redirects kernel logs to GPIO14/15.
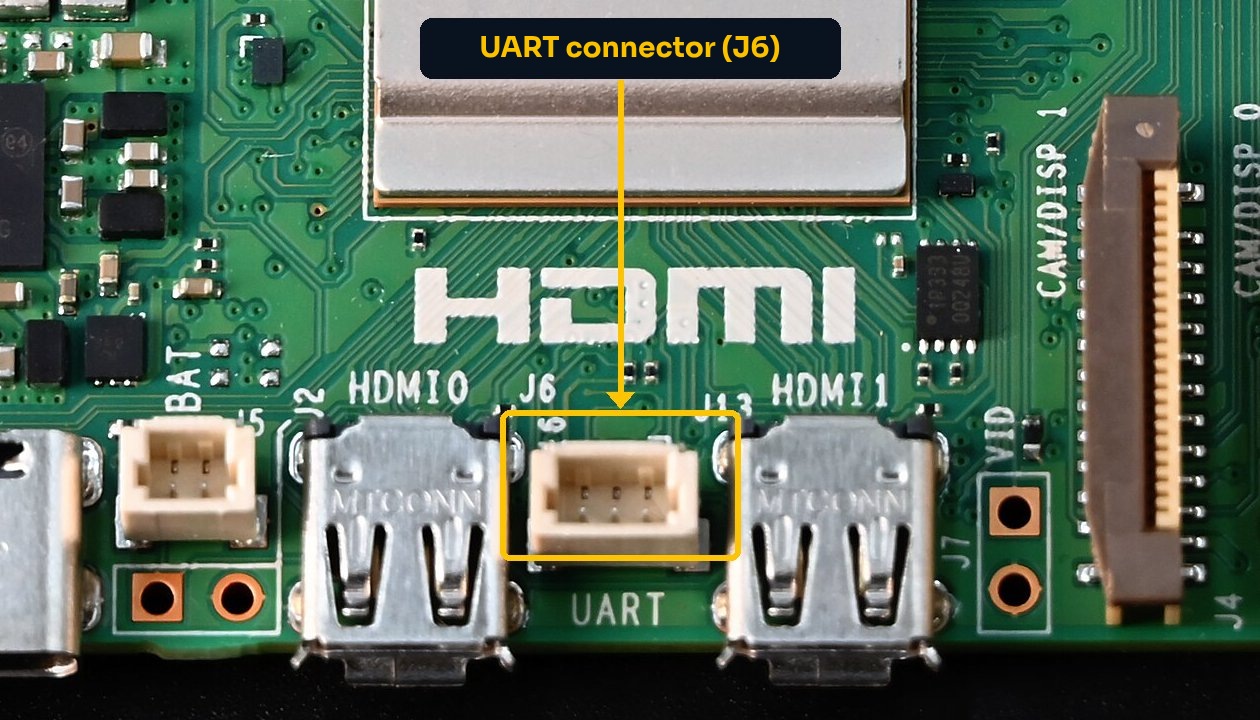
Fig. 3.1. The UART connector (J6) on the Raspberry Pi 5, between the micro HDMI sockets; this is where you plug in the Debug Probe cable. Photo: SimonWaldherr, CC BY-SA 4.0, Wikimedia Commons; cropping and labels: wirelab, CC BY-SA 4.0.

Wiring (Pi 4, or Pi 5 in GPIO14/15 mode):
⚠️ Make the connections with the Pi switched off and the adapter unplugged from your computer's USB. If the adapter has a voltage jumper, set it to 3.3 V. A 5 V signal on the RX pin (GPIO15) can damage the Raspberry Pi.
| Physical pin | BCM | Element |
|---|---|---|
| 8 | GPIO14 (TXD) | → adapter RX |
| 10 | GPIO15 (RXD) | → adapter TX |
| 6 | – (GND) | → adapter GND |
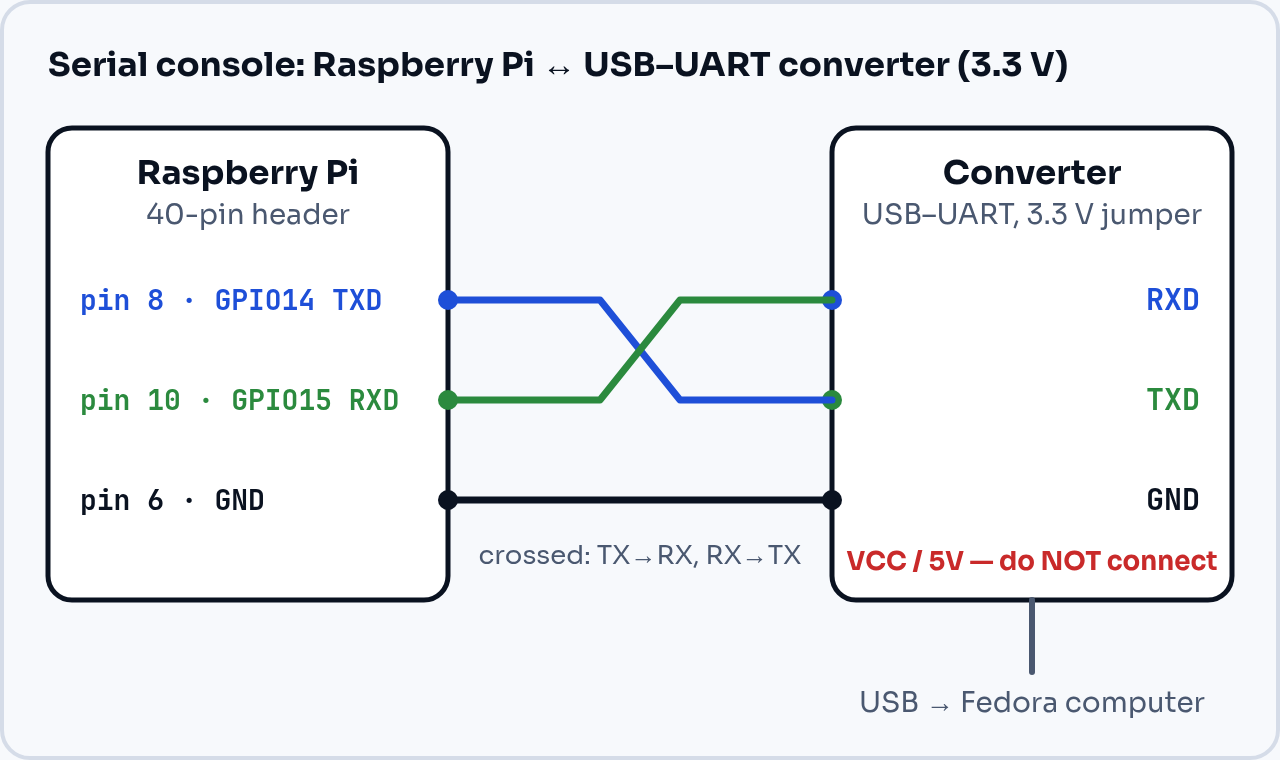
Fig. 3.2. Serial console: TX and RX crossed over, common ground, no power from the adapter.
⚠️ TX goes to RX, crossed over. Do not connect the adapter's VCC/5V pin to the Pi, because the Pi has its own power supply. The GND wire is mandatory: the TX and RX signal voltages are measured relative to ground, so both devices must share a common ground.
Connecting from Fedora (115200 bps, 8N1, which is the Raspberry Pi console standard):
# (on Fedora)
$ minicom -D /dev/ttyUSB0 -b 115200
# exit minicom: Ctrl+A, then X
# or:
$ screen /dev/ttyUSB0 115200
# exit screen: Ctrl+A, then K
In minicom, turn off hardware flow control (Ctrl+A, O → Serial port setup → Hardware Flow Control: No), otherwise the keyboard may appear not to work.
Common mistakes
ssh: Could not resolve hostname: mDNS isn't working on your network or on your Fedora machine. Use the IP address fromnmapor from your router.Connection refused: SSH wasn't enabled in Imager. Write the card again with SSH turned on.WARNING: REMOTE HOST IDENTIFICATION HAS CHANGED!after rewriting the card: that's normal, because the new system has new host keys. Remove the old entry:ssh-keygen -R wirelab-pi.local.- The Pi won't connect to Wi-Fi: wrong network name (case matters), a 5 GHz-only network (the Zero 2 W supports 2.4 GHz only), or the wrong country in the localisation settings.
- Garbled characters on the serial console: wrong speed (it must be 115200) or no common ground (GND).
Exercise
Log in over ssh, run the update and write down the output of cat /etc/os-release | grep PRETTY and uname -r. Then log out (exit) and log in again using the ssh pi alias.
Summary
The Pi works without a monitor: a card written in Imager connects to Wi-Fi straight away and lets you in over SSH with a key. You find the Pi by its .local name, with an nmap scan or in your router's admin page. You update the system with apt full-upgrade. The serial console is an emergency way in when the network fails.